This blog is no longer active. All content from this blog has been moved to my new website: LoriDanelle.com. To view this post on the new site, click here.
*********************************************************************************************Since the Sisters' room is so jam-packed with things that I made myself, I thought I'd share with you how I did them over the next week or so (or how ever long it takes to fit it all in!!)! That's what you've really been wanting anyway, right?
Some of these projects I've shared over that last year in whole or in part, but since so many of you are new—(WELCOME!!! I'm ecstatic that you've found your way here & like what you see enough to come back!)— I thought I'd start by re-sharing some of those projects so everything could be found in one place.
I have a hard enough time hunting down stuff that I know is there, let alone trying to find something that I hope might be there! :)
First up, the Paper Lantern & PomPom grouping!
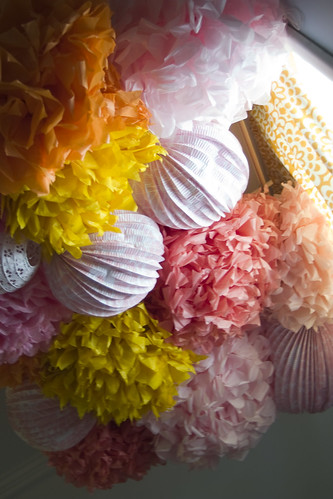
It's no secret I love the room Ashley Ann created from her daughter, and this is another project that was borrowed from that room.
When I made my grouping, all the supplies that Ashley had used were no longer available, with the exception of the pom-pom kit which I found at Michael's. However, I just did an on-line search, and I didn't find them now. Oh well! You don't need it! You're about to get the tutorial!! (and save a bunch of money!! She charged rather a lot for some tissue paper!!)

For the pictures shown here, I was using the paper supplied in the kit.
However, these were SO EASY a kit was definitely not required!! In fact, I've made many more without the kit, including the yellow and orange pom-poms shown in my grouping.
For each pom-pom, you'll need:
10 sheets of 17in x 30in (Medium) tissue paper in desired color
—OR—
14 sheets of 20in x 30in (Large) tissue paper in desired color
12in section of floral wire
(I'm using paper from the kit which is pre-scored & cut, but this isn't necessary to have done already)
Lay all 10/14 sheets of tissue paper in a stack

Accordion fold into 1 3/4 inch sections. No need to stress about how precise you are. Just get close. All your folding will be undone before we're finished!

Once the whole length is folded, Cut the ends either into a point or a half circle, depending on desired results. ( I do not have a picture of this step, as I mentioned, mine was already done.) You can see how each would look in the top pictures.
Now, wrap and secure it in the middle with the wire.

Fan out the folds and begin to separate the individual sheets of tissue paper.

Once you've completely separated the sheets, shape it into the desired pom-pom.

Fold and twist the remaining wire into a loop to use for hanging.
Additional lanterns can be purchased in many places, but I found mine here, at Luna Bazaar.
For a frame, I just took 4 dowels purchased from Home Depot and made a rectangle by first drilling pilot holes and then threading them with eye bolts, so that I could then hang it from the ceiling.
Attaching the pom-poms and lanterns was a little bit of trial and error as I arranged and re-arranged until I like the look. I attached everything by using wire that I could easily secure and remove if needed!
And that's it!!!!
Really.
Super easy.
And lots of fun.
If you still don't like the idea of making your own pom poms from scratch I know of a few etsy shops that sell kits in any shade your heart can dream up! All you would need to do is unfurl them. Just do a search for pom pom and you'll definitely find something to suit your needs!!
Enjoy!
(and let me know if you have any questions!)
xoxo Lori Danelle
I am so in love with poms right now and this tutorial looks so helpful. Will have to make some...and now I know where to come if I have questions! Great post :)
ReplyDeletei love them! i wanted to make some. but i didn`t have enough time till now.
ReplyDeletehow were you able to make the more rounded ones? (the white ones in the first pic?) :)
ReplyDeletelove your post.
If your referring to the ones I think you are, the lanterns were all purchased. The accordian folded looking ones were bought as a kit at Michael's craft store & the eyelet white lantern peeking in from the left side of the photo was purchased at lunabazaar.com
ReplyDeleteIf you are talking about the pom pom with the rounded edges, I just cut the ends round once I had the tissue paper folded up, instead of cutting them into points.
Hope that helps!!